

How to Use Dry Rub on Chicken Step by Step
Table of Contents
- What You'll Need Before You Start
- Step 1: Prep the Chicken for Dry Rub
- Step 2: How to Make Chicken Rub Stick
- Step 3: How Much Dry Rub Per Pound of Chicken
- Step 4: How Long to Marinate Chicken With Dry Rub
- Step 5: Cooking Methods and Internal Temperatures
- Common Mistakes and Troubleshooting
- Frequently Asked Questions
Last Updated: September 15, 2026
What You'll Need Before You Start
Great dry rub chicken starts with the right tools, not the fanciest ones. This guide from Dam Spice Company covers how to use dry rub on chicken step by step, from prep to plate, so you get a seasoned crust worth fighting over.

A dry rub is a blend of ground spices, salt, sugar, and herbs applied directly to raw meat without any liquid. Unlike a marinade, it sits on the surface, forming a flavorful crust as the chicken cooks.
Before you touch the chicken, gather:
- A rimmed baking sheet or tray
- Paper towels
- A small bowl for your spice blend
- Olive oil or another neutral binder
- Clean tongs and a cutting board
- An instant-read thermometer
A common mistake is skipping the tray. Rub goes everywhere, and a rimmed sheet catches the mess so your counter stays clean.
Step 1: Prep the Chicken for Dry Rub
Pat the chicken completely dry with paper towels before anything else. Surface moisture is the number one reason rub slides off instead of clinging.
Trim any excess fat or loose skin, but leave the skin on. Skin-on, bone-in pieces hold moisture and give the rub a surface to grab. If you're working with breasts, keep them skin-on too.
Let the chicken sit at room temperature for about 15 to 20 minutes before seasoning. Cold meat tightens the skin and makes adhesion harder.
USDA guidance on safe poultry handling
Step 2: How to Make Chicken Rub Stick
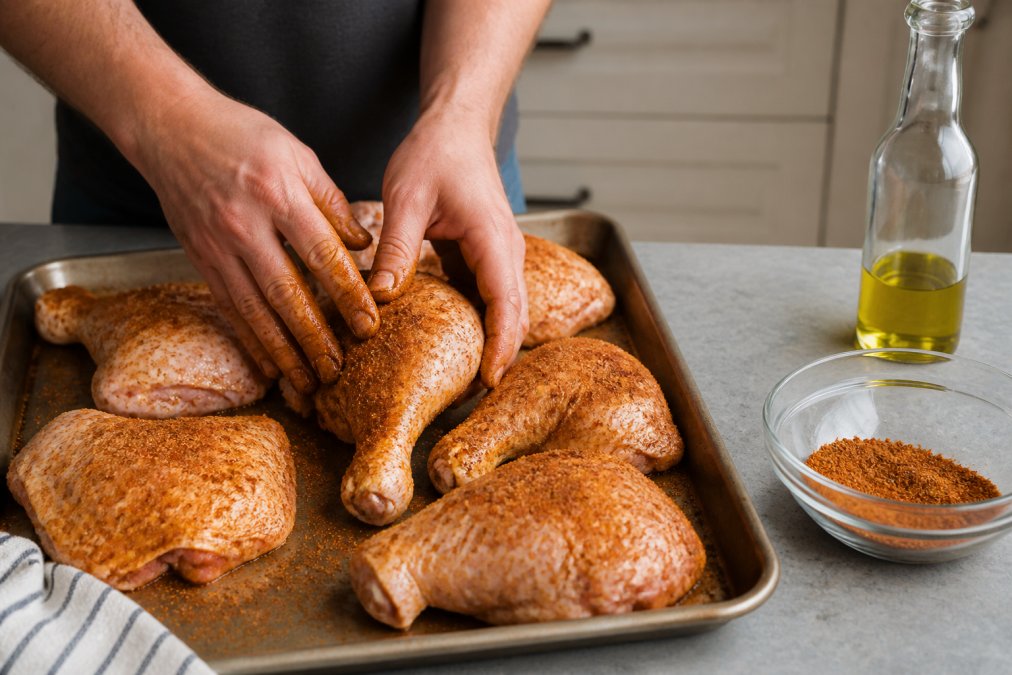
The trick to making chicken rub stick is simple: use a thin binder first, then press the seasoning in with your hands.
Coat the chicken lightly with olive oil, about half a teaspoon per piece. You want a sheen, not a puddle. Oil gives the spices something to grab onto and helps the crust brown evenly.
Then apply the rub with your nondominant hand, keeping your dominant hand clean for turning and adjusting. Massage the blend into every surface, including under the skin where it meets the meat. That's where flavor penetration actually happens.
Step 3: How Much Dry Rub Per Pound of Chicken
Use roughly 1 to 2 tablespoons of dry rub per pound of chicken. Start with 1 tablespoon, then add more if the surface looks bare.
Here's a quick reference:
| Chicken Amount | Dry Rub | Notes |
|---|---|---|
| 1 lb (about 2 pieces) | 1 tbsp | Light coating |
| 2 lbs (4 pieces) | 2 tbsp | Standard coverage |
| 3-4 lbs (whole bird) | 3-4 tbsp | Includes under skin |
| 5 lbs (party batch) | 5-6 tbsp | Apply in batches |
More rub isn't always better. Too much salt-heavy blend can overwhelm the meat and burn before the chicken cooks through. A common approach is to season, let it rest, then check coverage before adding more.
Step 4: How Long to Marinate Chicken With Dry Rub
Dry rubbing is not marinating in the traditional sense, but the rest time after application is where most of the flavor work happens. Understanding the mechanism helps you pick the right window for each cut.
The science of the rest. When salt in your rub contacts the surface of raw chicken, it draws moisture out through osmosis. That moisture dissolves the salt and spices, then gets pulled back into the meat proteins. This is the same principle behind a dry brine. The result is seasoning that reaches below the surface, plus a slightly drier skin that crisps better in the oven or on the grill. Sugar and larger spice particles stay mostly on the surface, building the crust.
Dry rub vs. wet brine timing. If you plan to wet brine, do it first, rinse, pat dry, then apply the rub. Applying rub before a wet brine washes most of it off. If you are dry brining (salt only or a salt-forward rub), you can combine the steps, apply once and let it sit. Do not stack a wet brine and a salt-heavy rub on the same bird; the total sodium will push the meat past pleasant.
Timing by cut.
| Cut | Minimum Rest | Ideal Rest | Max Before Texture Suffers |
|---|---|---|---|
| Boneless breasts or cutlets | 30 minutes | 1-2 hours | 8 hours |
| Bone-in skin-on thighs and drumsticks | 1 hour | 4-12 hours | 24 hours |
| Whole chicken (3-4 lbs) | 2 hours | 12-24 hours | 24 hours |
| Wings | 30 minutes | 2-4 hours | 12 hours |
Thin cuts cure fast because the salt has less distance to travel. A whole bird needs the long window because the salt has to work through skin and into the thickest muscle.
Refrigerate uncovered for the first 2 to 4 hours. Airflow dries the skin, which is what gives you a crackling crust. Past 4 hours, loosely tent with parchment or a clean kitchen towel so the surface does not dry out so far that it turns leathery. Do not wrap tightly in plastic, trapped moisture undoes the drying benefit.
Pull from the fridge 20 to 30 minutes before cooking. Cold meat cooks unevenly and the rub can sweat. A short tempering window evens out the cook.
Step 5: Cooking Methods and Internal Temperatures
Cook chicken to a safe internal temperature of 165°F (74°C), measured at the thickest part of the meat without touching bone (foodsafety.gov). Carryover cooking will add a few degrees after you pull it, so target 160°F to 162°F on the grill or in the oven and let it rest 5 to 10 minutes.
FoodSafety.gov safe minimum cooking temperatures
Match the method to the cut.
- Boneless skinless breasts. Sear over direct heat 2 to 3 minutes per side to set the crust, then move to indirect heat at 375°F to 400°F until they hit temperature. Breasts dry out fast, so pull early.
- Bone-in skin-on thighs and drumsticks. These tolerate higher heat and longer cooks. Indirect heat at 375°F for 35 to 45 minutes, finishing skin-side down over direct heat for 3 to 4 minutes to crisp.
- Whole chicken (3-4 lbs). Roast at 425°F for 20 minutes to render the skin, then drop to 375°F for another 40 to 50 minutes. Or spatchcock it, the flat profile cuts cook time nearly in half and puts more skin in contact with the pan.
- Wings. Indirect at 400°F for 25 to 30 minutes, then a 2-minute direct-heat pass per side. Or smoke at 225°F for 90 minutes, then finish hot.
- Smoking (any cut). 225°F to 250°F. Expect 2 to 4 hours for pieces, 3 to 4 hours for a whole bird. The low heat gives the rub time to build bark without scorching.
Sugar is the burn variable. Rubs with brown sugar, honey powder, or maple sugar start to caramelize around 320°F and scorch above 350°F. If your blend is sugar-forward, keep the cook below 350°F or move the chicken to indirect heat for the back half.
Common Mistakes and Troubleshooting
Frequently Asked Questions
Do you put dry rub on chicken before or after cooking?
Always apply dry rub before cooking. For the best flavor, season the chicken at least 30 minutes ahead, or up to 24 hours if you have time. The rub needs contact time to draw out moisture and let the spices penetrate. Applying rub after cooking just gives you a dusty surface, not the deep flavor and crust you want from a proper dry rub chicken.
How do you get dry rub to stick to chicken?
Pat the chicken completely dry with paper towels first. Then apply a thin layer of olive oil or mustard as a binder, and massage the rub in with your hands, using your nondominant hand to sprinkle so you don't contaminate the spice jar. Let the seasoned chicken rest at room temperature for 15 to 30 minutes. The salt in the rub pulls moisture to the surface, which helps the spices adhere and form a crust.
What are some common mistakes when using dry rub?
The biggest mistakes are applying rub to wet chicken, using too much rub per pound, and not letting the seasoned meat rest before cooking. Another frequent error is cross-contamination: touching raw chicken and then reaching back into the spice jar. Always pour rub into a separate bowl or use one hand for sprinkling. Finally, don't crank the heat too high, because sugar in the rub can burn before the chicken is cooked through.
Can I leave dry rub on chicken overnight?
Yes, you can leave dry rub on chicken overnight in the refrigerator. Cover it loosely with plastic wrap or place it in a zip-top bag. This extended dry brine gives the salt time to penetrate the meat, resulting in deeper flavor and juicier meat. For bone-in pieces, 12 to 24 hours works well. For boneless breasts, 2 to 4 hours is plenty, since longer exposure can make the surface too firm.
Seasoning chicken well comes down to technique, not luck: dry the surface, use a thin binder, and give the rub time to work. Dam Spice Company makes that final step easy with all-natural, additive-free blends crafted in New Mexico, no MSG and no fillers. Try Dirty Bird for everyday chicken or Dam Butt Rub for a bolder BBQ crust. Add to cart and taste the difference a real Southwest blend makes.